- Learn from the Living Library
Recipe for Bacterial Dyeing
GENERAL INFORMATION
Dyeing and processing of textiles is one of the most polluting steps of the fashion industry. At every step of the process, the massive amounts of polluted waste water is released in the environment. Before the discovery of synthetic dyes, textiles were dyed with natural dyes: plants, flowers, roots, insects and minerals. Synthetic dyes brought color stability, durability and fastness, but at a dramatic environmental cost.
Recently there has been a renewed interest in less polluting ways to dye, both ancient and very new. Bacterial dyes come in two variations, extracted colors and growing colors. In the extraction method the dye is harvested and used in a more traditional way to produce pigments.
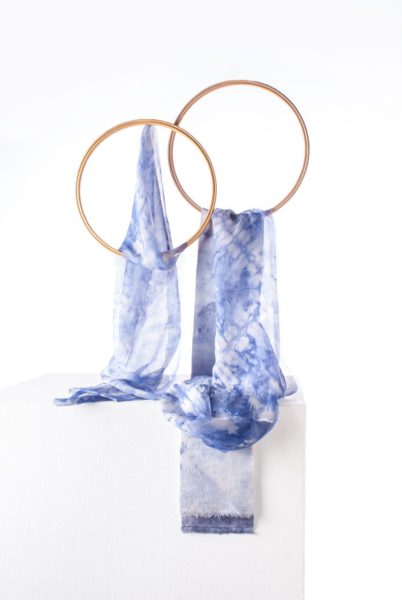
A novel and more organic method is to let the bacteria dye the material on the spot. This method has a collaborative character: the designer determines the framework for the design, which interacts with the natural growth of the bacteria. This procedure creates patterns on textiles as a collaboration between the bacteria and us.
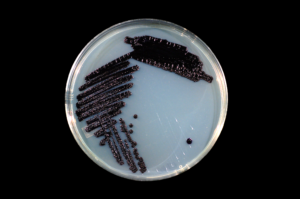
The bacterium that we are using is Janthino Bacterium Lividum which produces a dark blue/purple pigment called Violacein which is also anti-bacterial and anti-fungal.
RECIPE
Materials for Dyeing many small pieces of cloth
- 25g of powdered LB broth (check the required amount on the package, normally 20-25g/L)
- this is liquid laboratory grade food/substrate for bacteria growth
- 1L Water (the amount you need depends on the material and the amount of material you want to Dye)
- Cotton
- to seal the autoclave bag
- Rubber bands
- to close the autoclave bag
- Glass Petri dishes and/or autoclave bags
- a container to sterilize the material and grow the bacteria
- Parafilm tape
- to seal off the Petri dish
- 70% Ethanol
- for sterilization
TOOLS
- A pan
- to make the LB broth
- Inoculation loop
- to sterilely add the bacteria to the fabric
- Tweezers
- to sterilely handle the fabric
- Pressure cooker
- to sterilize the fabric and LB Broth
- Electronic Scales
- to measure the LB broth powder
- Measuring Cup
- to measure the water
- Optional: Needle & thread
- Natural fabric
- Animal fibers will dye brighter and more vivid colours, vegetable fibers will have to be mordanted for vibrant colours
- Synthetic fabric
- Nylon, acrylic and plastic have all been tested with bacterial dyes
METHOD
1. The Textile
- Prepare the textiles in the desired style
- use Shibori or Tie-Dye techniques for example but using a shape to press against the fabric will also work
- place them inside a plastic disposable autoclave bag or glass petri dish
2. The LB Broth
- Fill the pan with a little over 1L
- In the pan, you will lose some water due to steam
- Measure the exact amount of LB broth
- dosage is 20-25gr / liter, check your LB broth powder container and measure out accordingly
- Add the LB broth to the water in the pan and slowly heat the water to completely dissolve the LB broth
3. sterilizing the samples and the LB broth
- put the fabric sample in the container
- small samples in a petri dish and large samples in an autoclave bag
- Add LB broth to the Petri dishes and the autoclave bags
- enough to fully soak the fabric but not so much that it is swimming in broth
- Tip: write your information on the Petri dishes and autoclave bags before putting things in there (name/date/bacterium/material/medium)
- Close the bags with the cotton and the rubber bands
- the air can move in and out through the cotton but very few bacteria will do so keeping the inside of the bag sterile
- Place all the bags and Petri dishes in the pressure cooker
- After the pressure cooker is pressurized, leave it to sterilize for 20 minutes before switching it off
- Leave to cool until a maximum of 30 degrees Celsius
- do not try to open the pressure cooker until the temperature is well below 100 degrees, this can lead to a sudden boil of the broth
- you can speed the cooling down of the bag under running cold water but make sure nothing gets in the bag
4. The inoculation
The insides of the bag are sterile now! You want to keep it that way and only inoculate it with the Janthinobacterium which gives the colour!
Petri Dishes
- Prepare the biosafety cabinet with ethanol, inoculation loop, the Janthinobacterium Lividum and the Petri dish with fabric
- Sterilize the inoculation loop with some ethanol or a flame (metal loop) if it is not from a sterile bag
- Carefully open the Janthinobacterium Lividum
- Use the inoculation loop to scoop a little lump of bacteria
- Carefully open the Petri dish with fabric and spread the lump of bacteria over the fabric
- repeat this 3x to have some points from where the bacteria can grow
- Tip: don’t move your hands over the opened Petri dish to avoid contamination
- Seal the Petri dish with Parafilm
Autoclave Bags
- Prepare the biosafety cabinet with ethanol, inoculation loop, the Janthinobacterium Lividum and the autoclave bags with fabric
- Sterilize the inoculation loop with some ethanol or a flame (metal loop) if it is not from a sterile bag
- Carefully open the Janthinobacterium Lividum
- Use the inoculation loop to scoop a little lump of bacteria
- Carefully remove the cotton ball and open the autoclave bag with fabric a little bit
- Spread the lump of bacteria over the fabric
- repeat this 3x to have some points from where the bacteria can grow
- Tip: don’t move your hands over the opened petri dish to avoid contamination
- Put the Cotton with rubber bands back to seal the bags
GROWING
- Now that Petri dishes have been inoculated they need to be stored at around 25 degrees celsius in an incubator for optimal growth.
- Slower growth is achieved at lower temperatures but it will still work
REFERENCES
- Bioshades by Waag, 2019, link
- Biocolour.fi, 2019, link
- BACTERIAL PIGMENTS Master Thesis by Evelina Juuri, 2020, link
- wikipedia Janthinobacterium Lividum, 2023, link
- Living Colour by Laura Luchtman & Ilfa Siebenhaar, 2016, link

